
This document describes the steps needed to install gradient fox in your AWS environment. It assumes you already have an existing AWS environment and that you understand the relevant concepts in AWS. For additional information, review the corresponding AWS online documentation before proceeding with the installation.
You must have an existing VPC with all the necessary components (subnets, security groups, route tables, etc.) configured and running before attempting to install the gradient fox components. Correct and secure configuration of your VPC is critical and beyond the scope of this document.
It is also assumed that you have deployed and tested gradient fox in your local environment using Docker compose, before trying to deploy it to AWS.
The correct webui and metrics images must be pushed to your private ECR repositories before they can be deployed in AWS. Make sure you have pulled the version of these images you wish to use to your local environment first.
In the AWS ECR console, create a private repository for webui.

Also create one for the metrics images.

After creating the repositories, tag the local images and push them to your ECR repositories. You should always use a version you have first tested and validated locally.
docker tag gradientfox/webui:1.1.2 xxx.dkr.ecr.us-east-1.amazonaws.com/gradientfox/webui:1.1.2
docker push xxx.dkr.ecr.us-east-1.amazonaws.com/gradientfox/webui:1.1.2

docker tag gradientfox/metrics:1.1.2 xxx.dkr.ecr.us-east-1.amazonaws.com/gradientfox/metrics:1.1.2
docker push xxx.dkr.ecr.us-east-1.amazonaws.com/gradientfox/metrics:1.1.2
If you already have a working Postgres instance in AWS you wish to use, you can skip this section. There are several flavors of Postgres in AWS you can choose from, this document describes the process for Aurora (PostgreSQL Compatible). If you want to use a different Postgres variant, the steps are similar, please refer to the AWS documentation of the database you selected.
The first step is to navigate to the Aurora section in AWS and create a new database. Give your new database a descriptive name, write down the master username/password you selected.
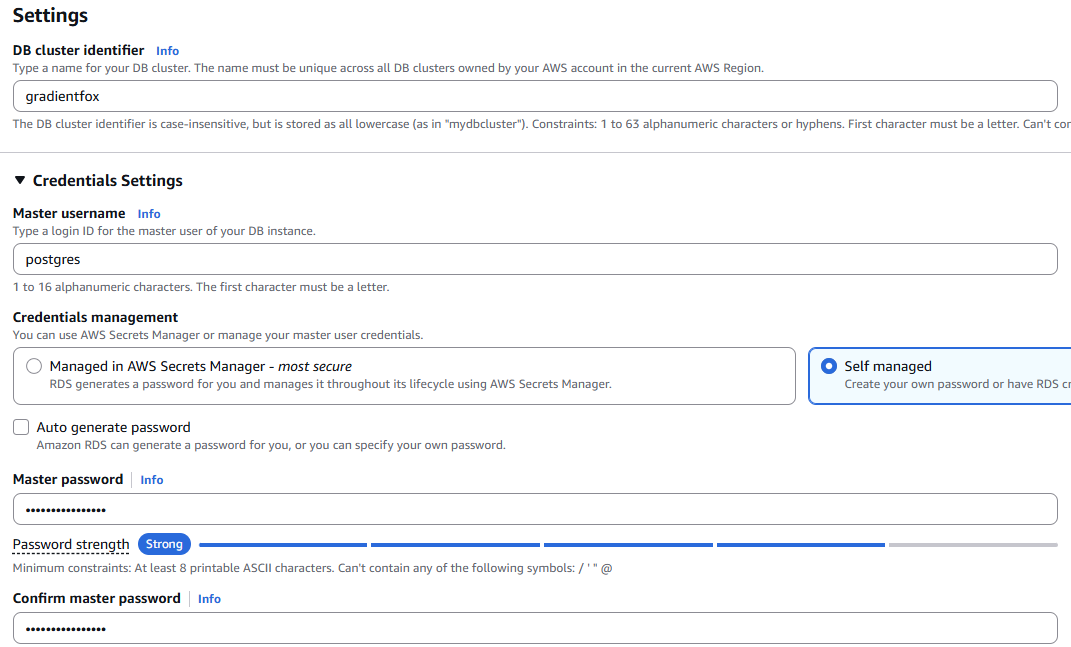
Under the database options, enter a name for the initial database. Typically this is set to postgres but you can also name it differently.

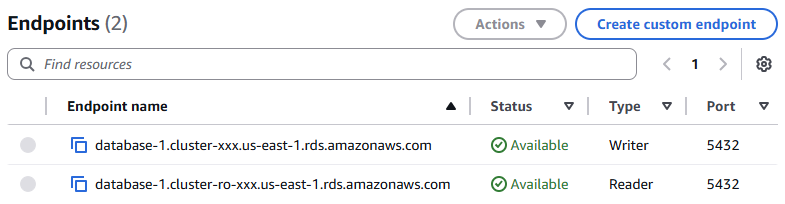
After creating the database, navigate to the Endpoints-section and write down the Writer-endpoint as it will be needed later.
You will need to create persistent storage for the metrics data that your gradient fox platform collects. The easiest method is to create a file system in Elastic File System. Navigate to the EFS section in AWS and click on the Create-button to create a new file system. Give it a descriptive name so that you can identify it easily later on. You can change the default settings if you want to, but it is usually not required.

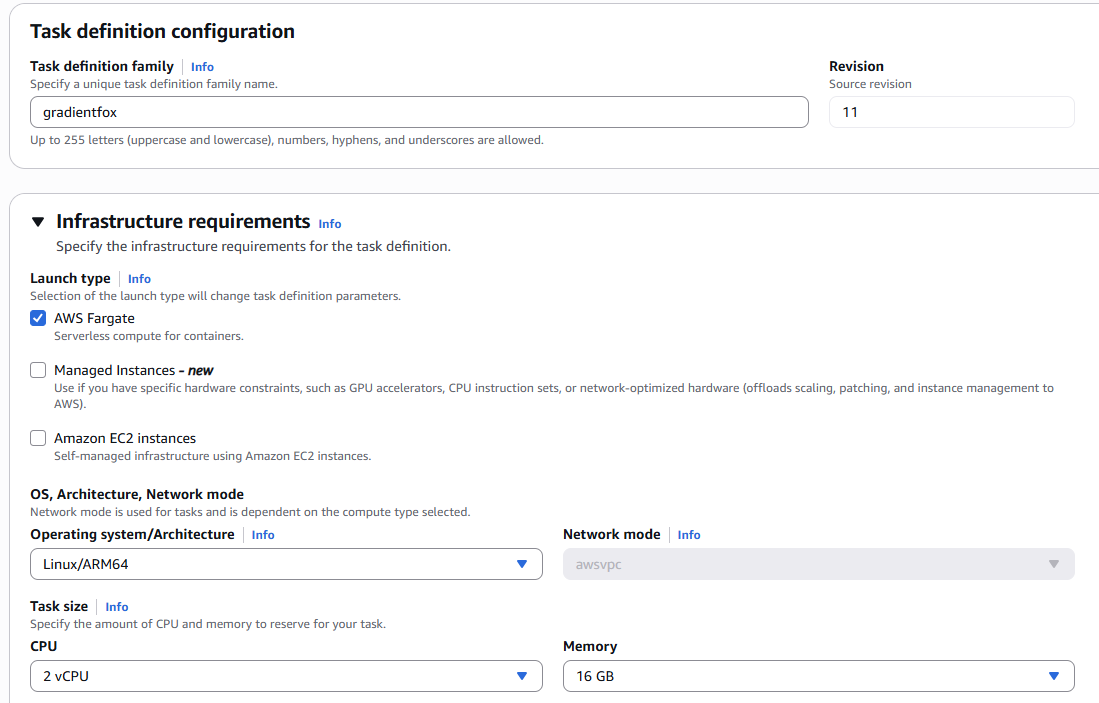
The gradient fox environment will be run in the Elastic Container Service (ECS). The first step is to create a template (Task Definition) for the service you will run in ECS. Navigate to the Task Definition section of ECS and click on Create new task definition. Give the definition a descriptive name so it is easy to identify from other task definitions you may have. Below we have selected Fargate as the Launch type for easier management. Make sure you choose at least 2 virtual CPUs and 16GB of RAM for you infrastructure. Also make sure the Architecture matches with the architecture of the image you uploaded to ECR earlier on.
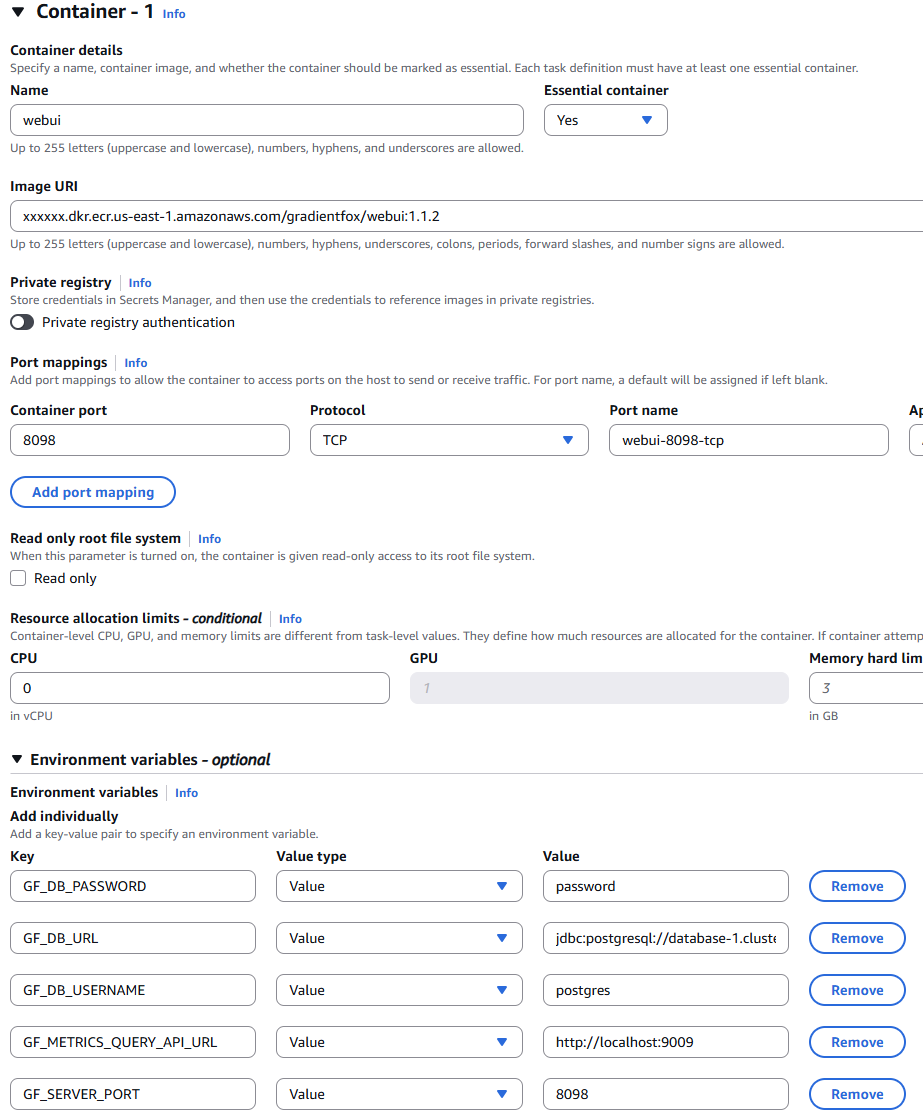
In the task defintion we need to have two container specifications. The first one is for the webui component, the relevant settings for it are displayed below. In the image URI, paste the webui URI from ECR. In the Ports-section, add a port mapping for port 8098 (or a different port you wish to use). Make sure you use the same port in the GF_SERVER_PORT environment variable.
Make sure you have enabled log collection for the container so that you have visibility into the container to debug potential issues.
In the environment variables section, copy the database username, password, url and database name you selected in the Postgres section above and add the following variables.
GF_DB_USERNAME=[username]
GF_DB_PASSWORD=[password]
GF_DB_URL=jdbc:postgresql://[endpoint_url]/[database]
GF_METRICS_QUERY_API_URL=http://localhost:9009
GF_SERVER_PORT=8098
The final value for the GF_DB_URL environment variable should be similar to this, assuming you selected postgres as the initial database name.
jdbc:postgresql://database-1.cluster-xxx.us-east-1.rds.amazonaws.com:5432/postgres
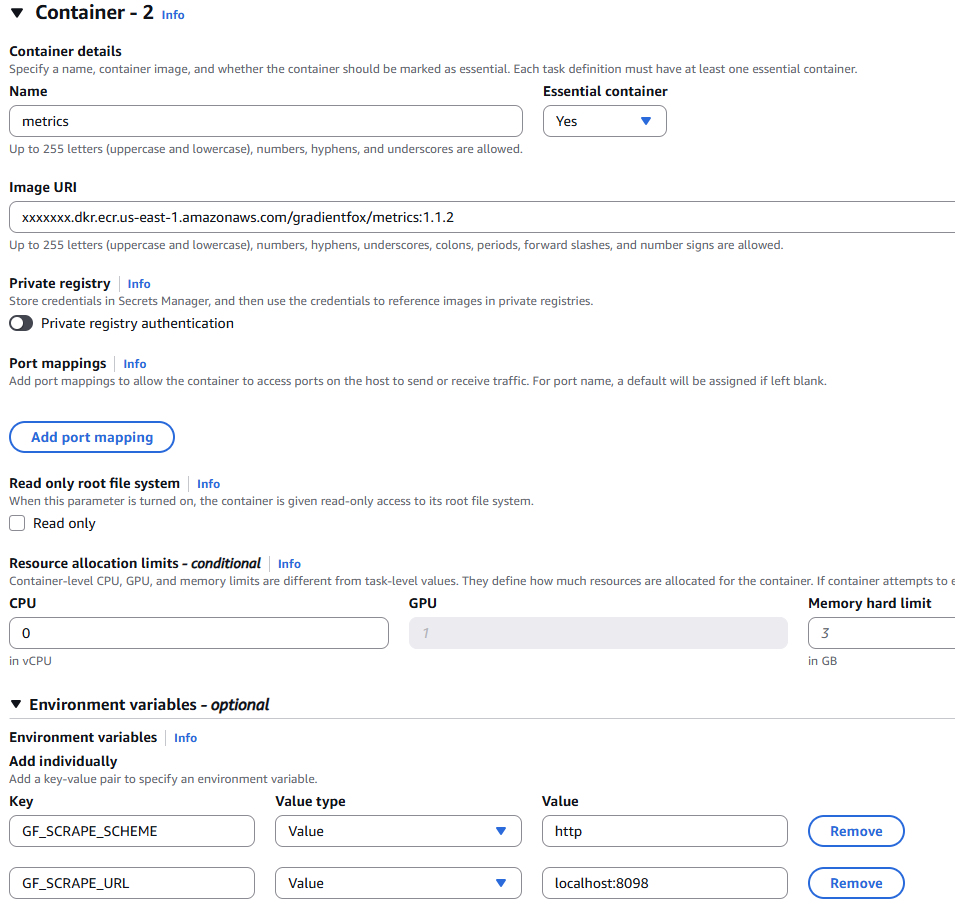
The second container is for the metrics component which collects the various metrics you see in gradient fox. In the image URI, paste the metrics URI from ECR.
Make sure you enable log collection for the container so that you have visibility into the container to troubleshoot any potential issues that might arise.
In the environment variables section, enter the following variables. Make sure the port matches the port you selected in the webui-section.
GF_SCRAPE_SCHEME=http
GF_SCRAPE_URL=localhost:8089
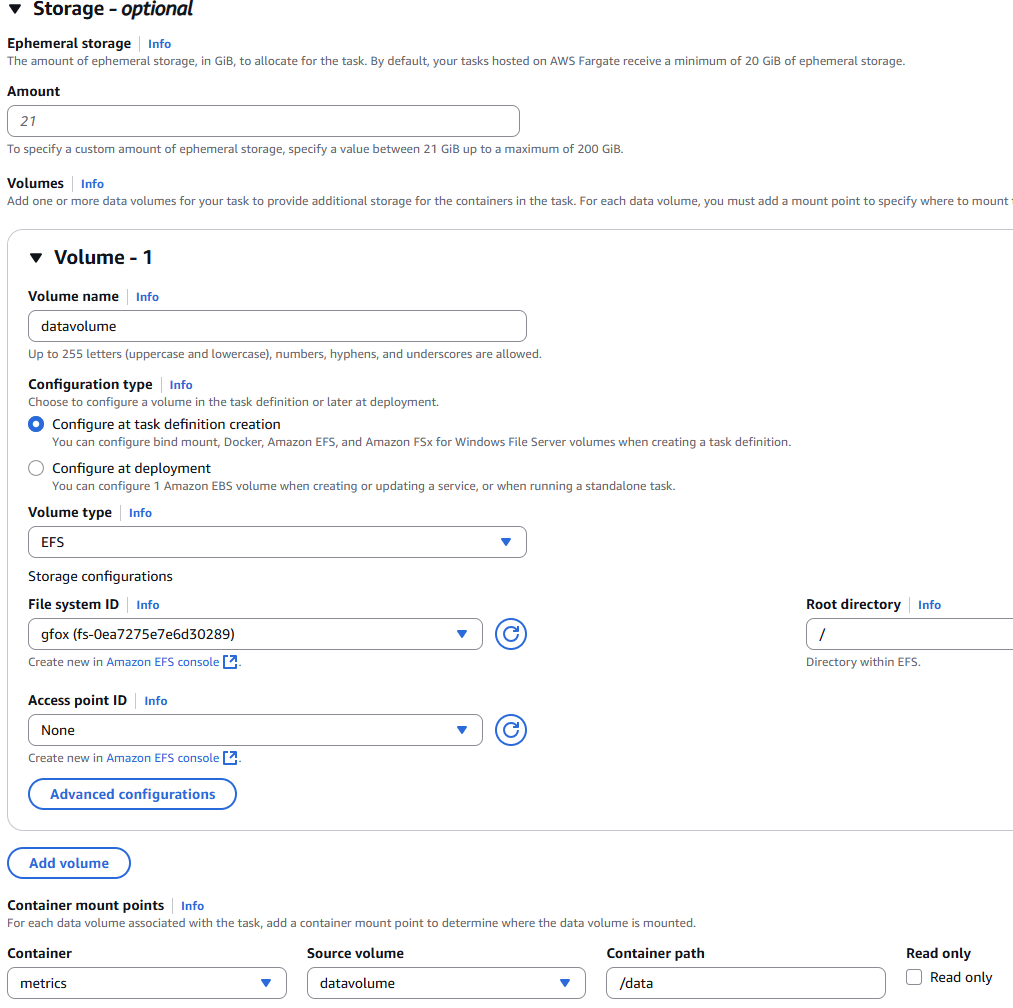
In the Storage-section of the Task Definition, we need to add a volume and to point to the EFS file system we created earlier in the EFS-section. In the Container mount points section, make sure the volume is mounted in the metrics container and that the Container path is /data.
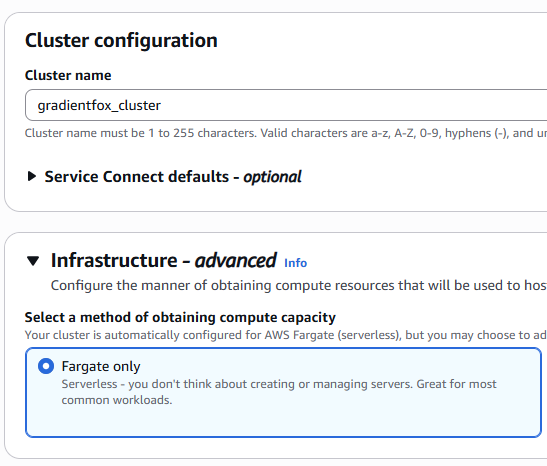
After creating the Task Definition for our containers, we need to create a cluster in ECS where we will run the gradient fox service. Navigate to the Clusters-section and click on the Create-button. Give the new cluster a descriptive name. We are using Fargate as our compute capacity for easier management.
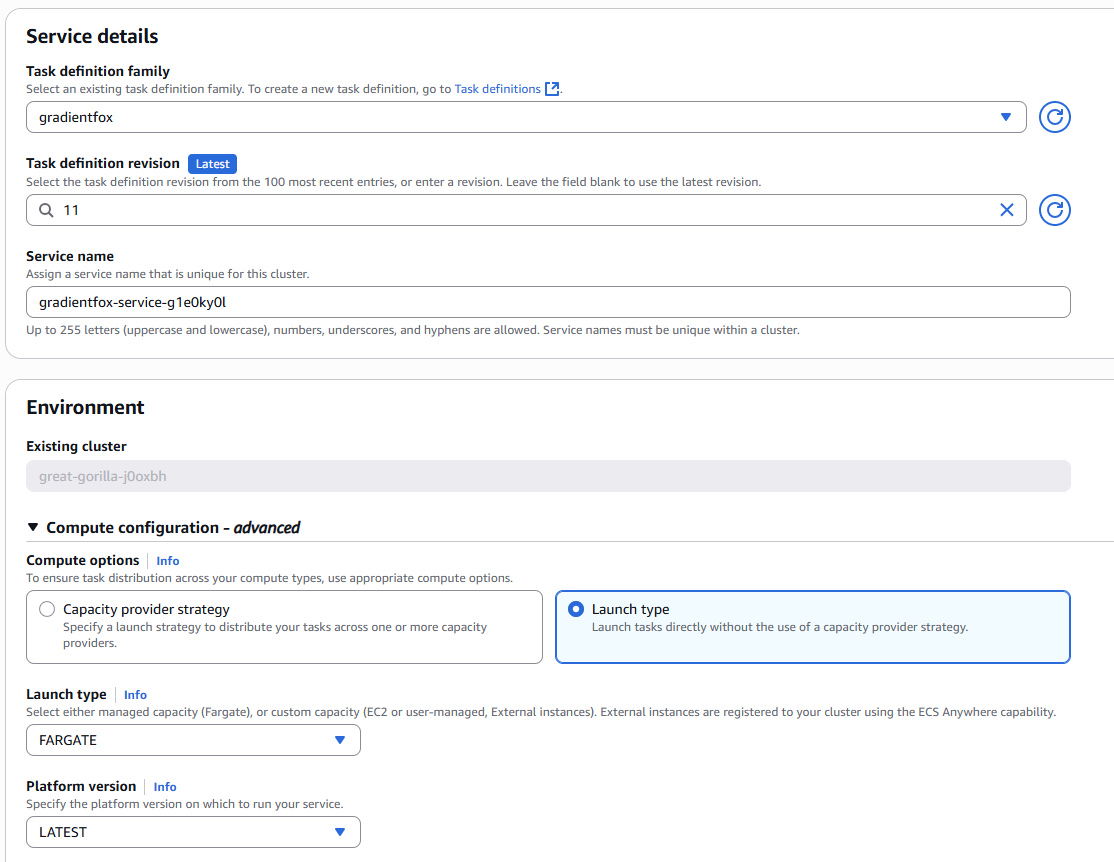
After creating the cluster, go to the Services-tab of your new cluster and click on the Create-button. Select the Task Definition you created in the previous step and select the correct version you wish to use (typically the latest). We are using Fargate again for this service. The other settings can be left at their default values.
After creating and starting the new service, make sure everything is running correctly under the Tasks-section of the service detail page. Also observe the logs in CloudWatch and make sure you see output from both containers and there are no errors.
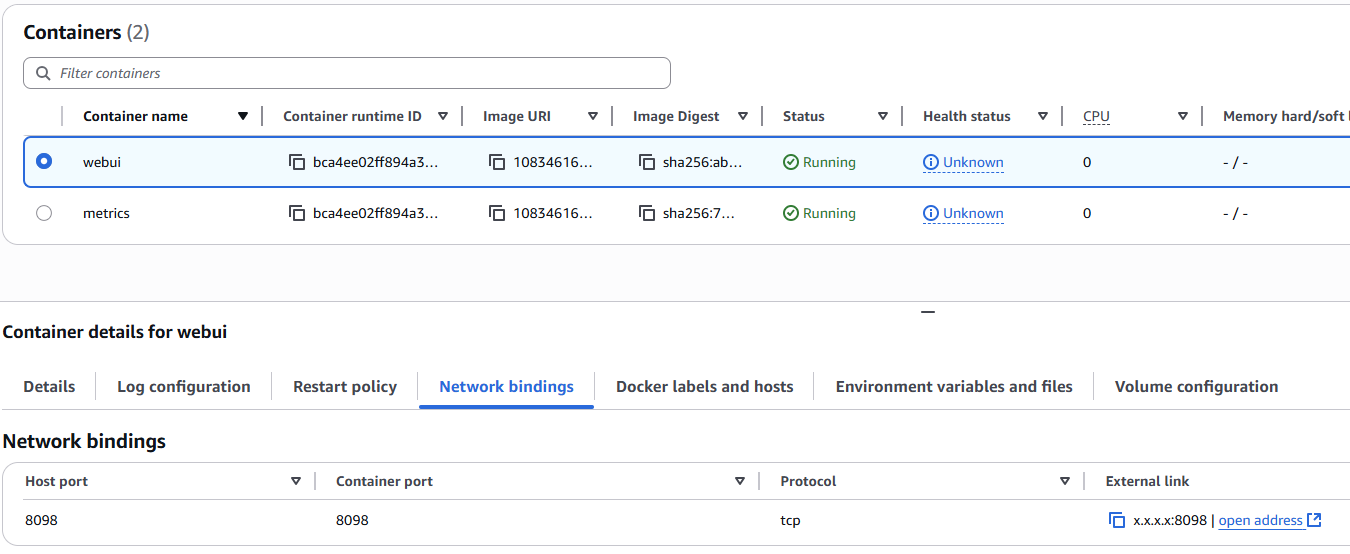
At this point your gradient fox environment is up and running in the AWS environment. Connect to the gradient fox web UI using the host/port you can find under the running Service/Task in the Network Bindings tab of the webui container details (External link).
After registering the admin account and logging in, you can connect to your MSK-cluster using the instructions in the Connecting documentation. Remember to use the internal ports when connecting as your gradient fox environment will now be running inside AWS.
With the configuration we created in the preceeding sections, the IP-address of the web UI will change after every service restart. Depending on your use case this may not be ideal, so you may want to create an Application Load Balancer between your clients and the gradient fox environment.
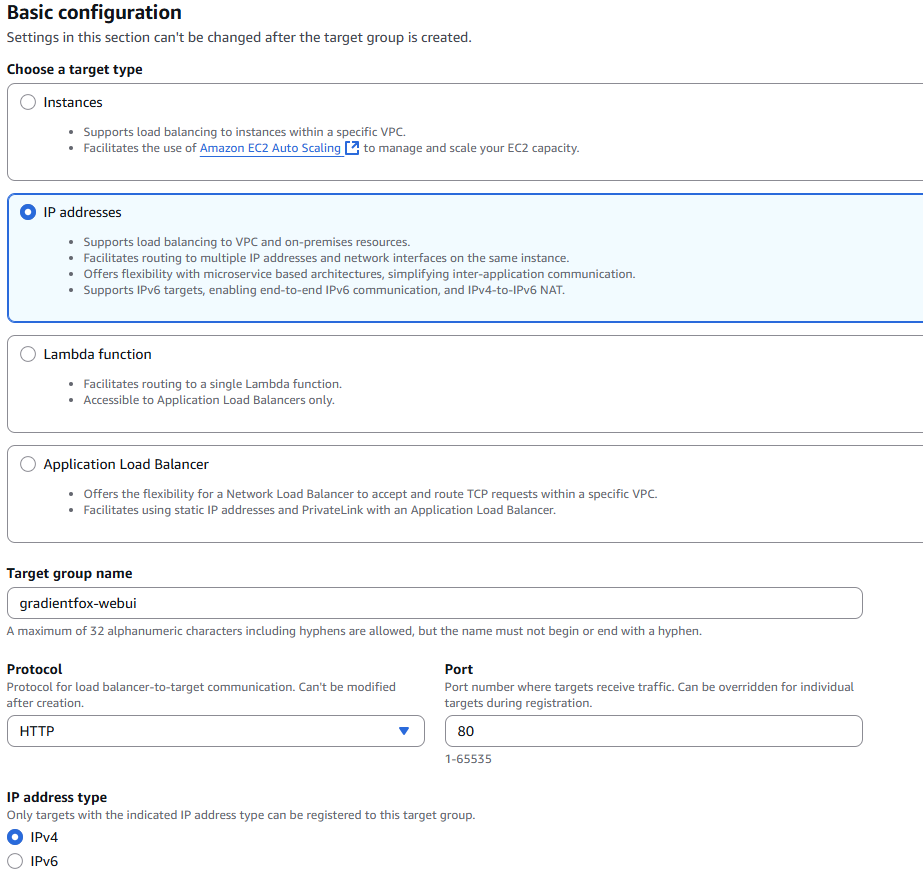
The first step is to create a target group for the load balancer. Navigate to the EC2 / Target Groups section in AWS and click on the Create-button. Choose IP addresses as the target type and select HTTP port 80 as the protocol. If you are using HTTPS, select port 443 instead.
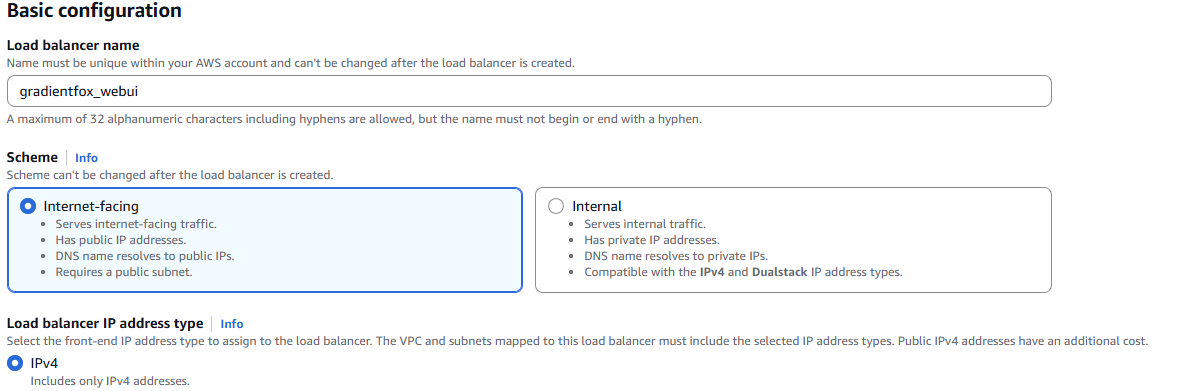
Next we will create the ALB itself. Navigate to the EC2 / Load Balancers section and click on the Create-button. Give the load balancer a descriptive name and make sure you select Internet-facing Scheme, unless you are only accessing the gradient fox environment from inside the AWS.
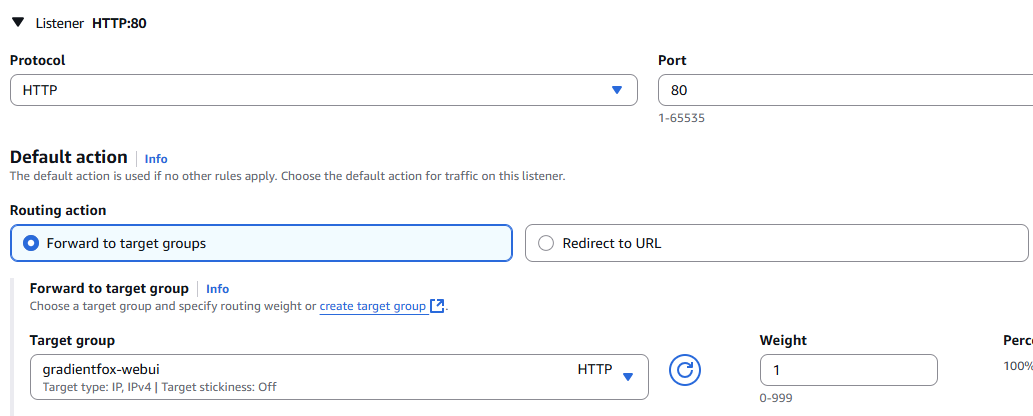
Under the 'Listeners and routing' section, select the same protocol and port you selected above. Also select the 'Forward to target groups' option and pick the target group you created earlier.
After creating the load balancer, you can use the DNS name shown on the detail page of the load balancer.
